DIY Roofing Repair Tips
A leaking roof can cause severe and costly damage to your home. When water infiltrates your home, it can lead to mold, frame rot, or destroy walls and plastering. This is why you should repair the roof as soon as you notice any damage. Handling a damaged roof can sometimes be simple, while at other times, it may take longer to diagnose the issue and determine whether you need a repair or a replacement. Some of the roofing repairs you may encounter are shingle replacement, partial reroofing, total reroofing, and flashing. Below are DIY roofing repair tips you should consider.

1. How to find the leak
Spotting a leak from the roof can be difficult, so begin roof inspection from the inside. If it’s not raining, look for mildew stains, water damage, and mold. Insulation quickly shows water damage, so look out for deteriorating insulation to locate the leaking area. When inspecting the crawl space or the attic, find any nails that weren’t correctly embedded in the rafters because poorly shot nails can cause leaks if affected by water and frost.
Once you find the leaky spot, inspect the roof itself. Look out for anything that penetrates the roof, like plumbing, vents, skylights, chimneys, and more. Find signs like broken seals, deteriorated flashing, missing, cracked, or curled shingles, or clogged gutters. You may also consider contacting a roofing professional such as Landmark Roofing if you can’t locate the leak.
2. Use appropriate footwear
Loose granules, steep pitches, algae, and other debris can make it easy for you to slip and fall when working from the roof. Consider wearing roofing shoes or rubber-soled shoes to get good traction and reduce the chances of falling.
3. Use Appropriate Power tools
In repairing your roof, one of the things you must consider is using power tools, as it will help you make your job easy. Having power drill and cutting equipment can make your work reliable and take less time to consume; however, if you do not have this kind of tool. You can always search online or even visit one of the Parker Stores that offer a variety of equipment, from home tools to different machinery.
4. Fix the roof vents
Vents are an essential roof feature as they protect the roof from ice-buildup in winter. If your plastic roof vent housing is cracked or metal seams are broken, avoid caulking as it may not be a long-term solution. Consider replacing the damaged vents to avoid a recurring problem. Find out if there are any missing or pulled nails at the base’s bottom edge and replace them with rubber washer screws. Vents are an essential roof feature as they protect the roof from ice-buildup in winter.
5. How to replace the shingles
If your shingles are broken, missing, or loose, consider replacing them. Ensure the new shingles’ back edge slides under the row of shingles behind them and the front edges are in line with the shingles on the other side. Using galvanized roofing nails, fasten each shingle’s top and the nail’s head with roof cement and spread the cement so the shingle holds in place. For brittle curled shingles, soften them with a heat gun, so they don't break and flatten them out, then re-adhere their edges to the roof.
6. Don’t forget the flashing and seams
Flashing prevents water from entering your house. If it’s loose or has gaps around it, secure it with roof cement or nails. Using a putty knife, apply roof cement to any cracked or worn seams.
Endnote
Roof repairs can be tricky, and although you do them yourself, know when to call in a professional. Consider using the above tips for your next roof repair project.
- by Matt Watts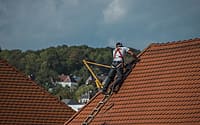