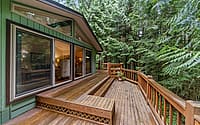
Building a Deck Made Easy: Useful Tips From the Experts
Like most people, you may think that building a deck is beyond your abilities. After all, it does seem like a complicated task, what with all the measurements and cutting and nailing involved. But what if you learn that with a little bit of guidance, anyone can build a deck that looks great and lasts for years? Here are some tips from the experts to get you started.

Simplify Joist Hanging
When creating your deck, the first thing you need to do is focus on the joist hanging. This involves attaching the joists to the ledger board, the horizontal beam that runs along the house’s edge. To do this, use joist hangers rather than nailing the joists directly into place. It will make the job a lot easier and help prolong the life of your deck.
Perfect the Notching and Cutting
Next, you need to ensure that your notches and cuts are accurate. This seems like a no-brainer, but it’s one of the most critical aspects of building a deck. If your cuts are slightly off, it can throw the whole structure off balance. So take your time, measure twice, and cut once.
This can cause the deck to collapse or be unstable, obviously a safety hazard. It’s therefore imperative to make sure that all of your cuts are accurate.
Use Quality Decking Boards
As for the decking boards themselves, you have a few different options. The most popular choice these days is composite decking, made from wood and plastic. It is low-maintenance and long-lasting, but it’s also more expensive than traditional lumber.
You can also use cedar or redwood for your decking boards. These woods are naturally resistant to rot and insect damage, so they don’t require the same level of maintenance as pressure-treated lumber. Cedar and redwood are also more expensive, but many people feel they are worth it.
No matter what type of decking board you choose, make sure you buy them from a reputable source. Nowadays, you can find a wide range of composite decking online, but not all websites are created equal. When buying decking boards, it’s essential to buy them from a site specializing in selling lumber and other building materials. This way, you can be sure that you’re getting quality boards that will last for years.

Use Galvanized Nails and Screws
Ensure that you use galvanized nails and screws when attaching the decking boards to the joists. Galvanized nails and screws are made of steel that has been coated in zinc, which makes them resistant to rust and corrosion. This is important because it will help to ensure that your deck lasts for many years, even if it’s exposed to the elements.
To give your deck a clean, finished look, use hidden fasteners. Hidden fasteners are small metal clips that attach the decking boards to the joists without being visible. This gives your deck a smooth, seamless appearance.
Space Balusters With a Jig
When spacing the balusters (the vertical posts that go between the handrails), you must be precise. But rather than trying to eyeball it, use a jig. A jig is simply a template that you can use to ensure that your balusters are evenly spaced. Once you have the jig in place, you have to insert the balusters and screw them into place.
Hang Stronger Stair Stringers
If your deck has stairs, you need to ensure that the stringers (the horizontal beams that support the steps) are extra sturdy. To do this, use two-by-sixes rather than two-by-fours. And when attaching the stringers to the deck frame, use through bolts rather than nails or screws. It will help to ensure that your stairs are safe and robust.
Straighten Your Bowed Deck Board
If you notice that one of your deck boards is bowed, don’t worry. This is quite common. The best way to fix it is to straighten it out with a belt sander. First, make sure that the board is adequately supported so that it doesn’t move while you’re sanding it. Then, start at one end of the board and slowly move the sander back and forth until the board is nice and straight.
What if you don’t do the straightening? The warped board will eventually cup, which means that the edges will start to curl up. It can cause the decking boards around it to become loose, creating a trip hazard.
Trim Deck Boards Well
When trimming your deck boards, it’s essential to leave an overhang. It will help to protect the ends of the boards from water damage. But be careful not to go too much overhang, as this can make the deck look unbalanced. A good rule of thumb is to leave about an inch of overhang on each side.
If you don’t trim the deck boards, they will eventually start to rot. Water will seep into the end grain of the wood, and over time, this will cause the boards to break down. So it’s essential to take the time to trim your deck boards properly.
Besides, use flashing. This is a thin strip of metal that helps to prevent water from seeping behind the ledger board and damaging your home’s siding. So be sure to install flashing before you attach the ledger board.
Craft a Beveled Post Cap
If you want your deck to have a professional-looking finish, consider creating a beveled post cap. You’ll need a piece of two-by-four and a miter saw to do this. Cut the two-by-four at a 45-degree angle. Then, cut another piece at a 22.5-degree angle. Finally, glue and screw the two pieces together. It will create a post cap that has a nice, clean finish.
The caps on the rail posts serve two purposes. First, they provide a decorative element. But more importantly, they help protect the ends of the boards from water damage. By leaving a little bit of overhang, the caps will help keep water from seeping into the cracks and causing the panels to rot.
Building a deck can be a fun and rewarding experience. But it’s essential to do it right. By following these tips from the experts, you can be sure that your deck will look great and be long-lasting.
- by Matt Watts


